Learn the basic yet essential processes involved in building a .NET application that uses an Oracle database.
With the popularity of Microsoft's .NET Framework, many developers are hungry for information about the best means of integrating .NET applications with Oracle—not only in terms of basic connectivity, but also in relationship to effective and efficient application development using Microsoft Visual Studio 2010. (The Visual Studio 2005/2008 version of this article is found here. )
In this article, I'll explain the basic yet essential processes involved in building a C# or Visual Basic .NET application that uses an Oracle database, including:
You will have the opportunity to apply what you have learned in three practice labs, ranging in difficulty from the relatively simple to the more complex. If you are already familiar with building .NET applications for Oracle Database with Visual Studio 2005/2008, the experience with Visual Studio 2010 is very similar.
For information and labs about how to secure your application, see my article "Securing a .NET Application on the Oracle Database." (Also, see the OTN .NET Developer Center for technical articles covering a range of Oracle .NET application lifecycle issues.)
Note that the free Oracle Developer Tools for Visual Studio, available for download from OTN, provides a Visual Studio add-in that makes the development of .NET apps on Oracle much easier and more intuitive. That subject is beyond our scope here, however; see the Oracle Developer Tools for Visual Studio Product Center for more information.
In addition to basic Oracle client connectivity software, .NET applications require the use of what is known as a managed data provider (where "managed" refers to code managed by the .NET framework). The data provider is the layer between the .NET application code and the Oracle client connectivity software. In almost every case, the best performance is achieved by using a provider optimized for a specific database platform instead of the generic .NET OLE DB data provider.
Oracle, Microsoft, and third-party vendors all offer .NET data providers optimized for an Oracle database. Oracle and Microsoft make their Oracle data providers available for free. Microsoft's provider for the .NET Framework is deprecated. Oracle continues to support and develop their .NET data provider, Oracle Data Provider for .NET (ODP.NET). In this article, we will use ODP.NET, which is included with the Oracle Database or as a separate download.
ODP.NET provides standard ADO.NET data access, while exposing Oracle database-specific features, such as XML DB, data access performance optimizations, and Real Application Clusters load balancing and fast connection failover. The current ODP.NET version, 11.2, supports connecting to Oracle Database 9i Release 2 servers and higher versions. The database server can be on Windows, Linux, UNIX, or any other operating system platform Oracle database supports.
When ODP.NET and Oracle client software are installed, application development using Visual Studio can begin. It's a good idea to confirm client connectivity before starting development. If you can connect to Oracle Database using Oracle client software, such as SQL*Plus on the same machine as Visual Studio, then your Oracle client-side software is properly installed and configured.
If you are new to Oracle, see the section "Installing .NET Products" in the Oracle Database 2 Day Developer's Guide for background information regarding installing and configuring ODP.NET specifically, or to the Oracle Database Documentation Library for general information about Oracle Database.
Let’s create an ODP.NET application that retrieves data from the Oracle database. Later, we’ll see how to perform error handling with ODP.NET and handle an additional data retrieval scenario.
After starting Visual Studio, the first task is to create a project. You can either click New Project as shown below or select File | New | Project.
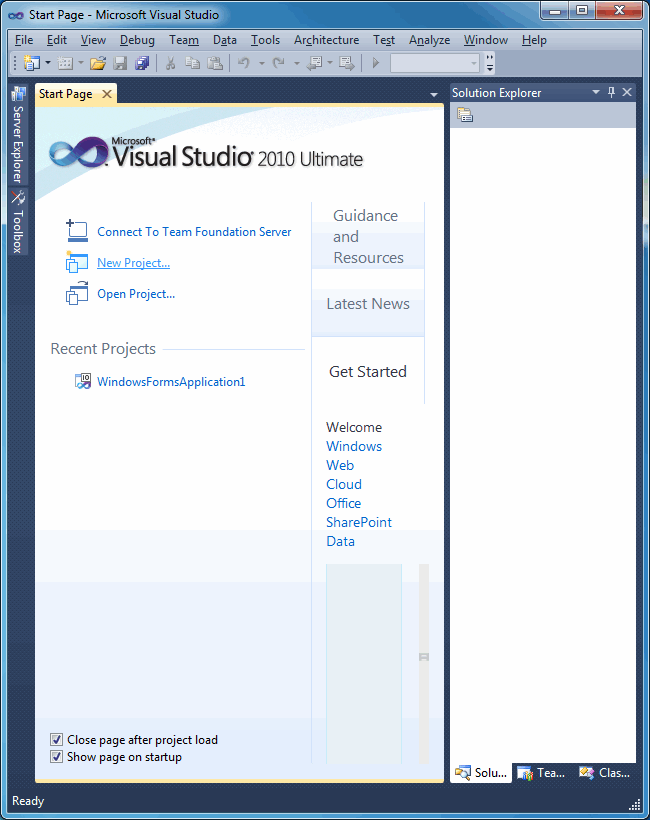
Figure 1 Creating a new project in Visual Studio 2010
A New Project dialog box appears. On the left side of the dialog box under Installed Templates, select the programming language of your choice. In our example, Visual Basic was chosen. On the middle of the dialog, choose a project template. To keep things simple, a Windows Forms Application is selected.
Figure 2 Using the New Project dialog
You'll want to specify meaningful names for the project name (we used OraWinApp) and the solution name (we used OraWinApp). A solution contains one or more projects. When a solution contains only one project, many people use the same name for both. Notice that there is a dropdown list box allowing you to specify which version of the .NET Framework you want to target. If you are writing applications for an older version of the .NET Framework, you should select the appropriate version from the dropdown list. Click the Ok button to continue.
Adding a Reference
Because our project must connect to an Oracle database, it is necessary to add a reference to the ODP.NET DLL containing the data provider of our choice. Within the Solution Explorer on the right side of Visual Studio, select the project name, right click and select Add Reference. Alternatively, you can go to the menu bar and select Project and then select Add Reference.
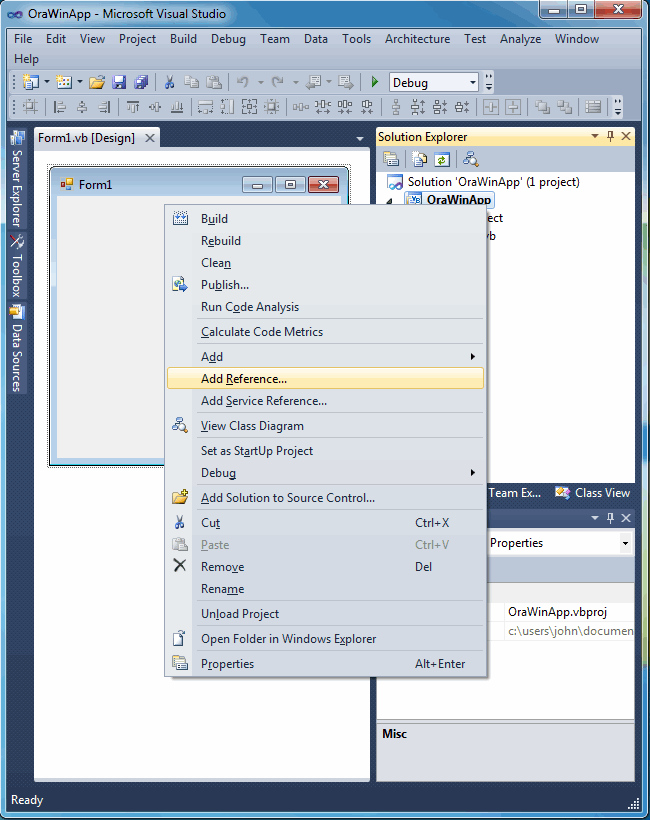
Figure 3 Adding a reference
The Add Reference dialog box appears. Select the .NET tab. Visual Studio will construct a list of .NET components available for you to add to your project. This may take several seconds. When complete, you can click on the Component Name column to alphabetize the component list.
Figure 4 Selecting the ODP.NET Managed Data Provider for .NET 4
ODP.NET is found under the Oracle.DataAccess component name. Select Oracle.DataAccess from the list, then click the OK button to make the ODP.NET data provider known to your project. Be sure to select the correction version. Since this is a .NET 4 project, the 4.112.2.0 version of Oracle.DataAccess was chosen here, but you can chose any ODP.NET version beginning with 4.
Visual Basic/C# Statements
After adding references, it is standard practice to add Visual Basic Imports statements or C# using statements. Technically, these statements are not required, but they do allow you to refer to database objects without using lengthy, fully qualified names.
By convention, these statements appear at or near the top of a code file, before the namespace or class declaration.
Imports Oracle.DataAccess.Client ' Visual Basic ODP.NET Oracle managed provider
using Oracle.DataAccess.Client; // C# ODP.NET Oracle managed provider
If you added the reference, Intellisense will help you complete the addition of an Imports or using statement as shown in Figure 5.
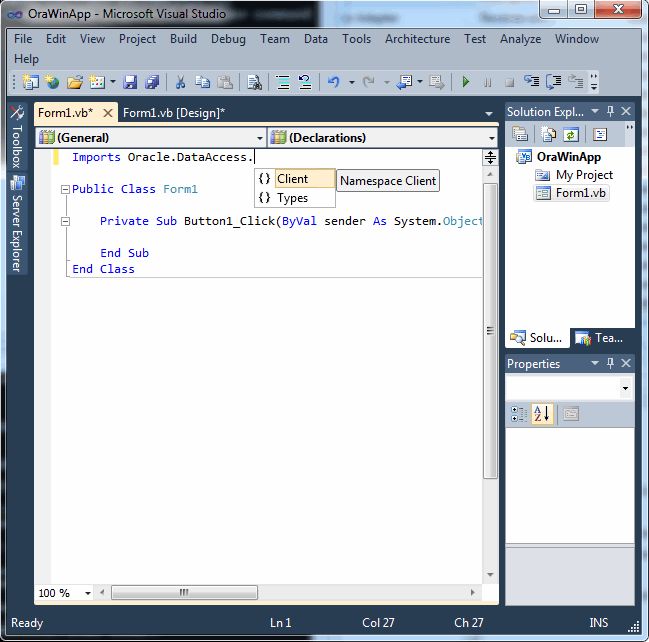
Figure 5 Adding an Imports statement in Visual Basic
Connection Strings and Objects
An Oracle connection string is inseparable from Oracle names resolution. In this article, we will connect to Oracle’s sample HR schema with user id “hr” and password “hr”. The tnsnames.ora file is an Oracle network configuration file that defines database addresses for establishing connections. Suppose we had a database alias of OraDb defined in a tnsnames.ora file as follows:
OraDb=
(DESCRIPTION=
(ADDRESS_LIST=
(ADDRESS=(PROTOCOL=TCP)(HOST=ORASRVR)(PORT=1521))
)
(CONNECT_DATA=
(SERVER=DEDICATED)
(SERVICE_NAME=ORCL)
)
)
The OraDb alias defines the database address connection information for the client. To use the OraDb alias defined in the tnsnames.ora file shown above, you would use the following syntax:
Dim oradb As String = "Data Source=OraDb;User Id=hr;Password=hr;" ' Visual Basic
string oradb = "Data Source=OraDb;User Id=hr;Password=hr;"; // C#
You can modify the connection string to obviate the need for the tnsnames.ora file, however. Simply replace the name of the alias with how it would be defined in a tnsnames.ora file. The database alias in this article is specific to my database setup. (Click here for more information about creating a database alias for your database.)
' Visual Basic
Dim oradb As String = "Data Source=(DESCRIPTION=" _
+ "(ADDRESS=(PROTOCOL=TCP)(HOST=ORASRVR)(PORT=1521))" _
+ "(CONNECT_DATA=(SERVICE_NAME=ORCL)));" _
+ "User Id=hr;Password=hr;"
// C#
string oradb = "Data Source=(DESCRIPTION="
+ "(ADDRESS=(PROTOCOL=TCP)(HOST=ORASRVR)(PORT=1521))"
+ "(CONNECT_DATA=(SERVICE_NAME=ORCL)));"
+ "User Id=hr;Password=hr;";
As you can see above, the username and password are embedded in the connection string in clear text. This is the simplest approach to creating a connection string. However, the clear text approach is undesirable from a security perspective. In particular, you must understand that compiled .NET application code is only marginally more secure than the clear text source code files. It is very easy to decompile .NET DLL and EXE files and view the original clear text contents. (Encryption is in fact the appropriate solution, but that subject would be a quite lengthy digression from our discussion here.)
Next, you must instantiate a connection object from the connection class. The connection string must be associated with the connection object.
Dim conn As New OracleConnection(oradb) ' Visual Basic
OracleConnection conn = new OracleConnection(oradb); // C#
Notice that the connection string is associated with the connection object by being passed through the object's constructor, which is overloaded. The constructor's other overload allows the following alternative syntax:
Dim conn As New OracleConnection() ' Visual Basic
conn.ConnectionString = oradb
OracleConnection conn = new OracleConnection(); // C#
conn.ConnectionString = oradb;
After associating a connection string with a connection object, use the Open method to make the actual connection.
conn.Open() ' Visual Basic
conn.Open(); // C#
We'll cover error handling later.
Command Object
The command object is used to specify the SQL command text that is executed, either a SQL string or a stored procedure. Similar to the connection object, it must be instantiated from its class and it has an overloaded constructor. In this sample, ODP.NET will perform a SQL query to return the department_name from the departments table where the department_id is 10.
Dim sql As String = "select department_name from departments where department_id = 10" ' Visual Basic
Dim cmd As New OracleCommand(sql, conn)
cmd.CommandType = CommandType.Text
string sql = " select department_name from departments where department_id = 10"; // C#
OracleCommand cmd = new OracleCommand(sql, conn);
cmd.CommandType = CommandType.Text;
Using different overloads, the syntax can be structured slightly differently. The command object has methods for executing the command text, which will be seen in the next section. Different methods are appropriate for different types of SQL commands.
Retrieving a Scalar Value
Retrieving data from the database can be accomplished by instantiating an OracleDataReader object and using the OracleCommand’s ExecuteReader method, which returns an OracleDataReader object. Returned data is accessible by passing either the column name or zero-based column ordinal to the OracleDataReader.
Dim dr As OracleDataReader = cmd.ExecuteReader() ' Visual Basic
dr.Read()
Label1.Text = dr.Item("department_name") ' retrieve by column name
Label1.Text = dr.Item(0) ' retrieve the first column in the select list
Label1.Text = dr.GetString(0) ' return a .NET data type
Label1.Text = dr.GetOracleString(0) ' return an Oracle data type
C# developers must use accessor type methods for retrieving data. There are typed accessors for returning .NET native data types and others for returning native Oracle data types, all of which are available in C#, Visual Basic, or any other .NET language. Zero-based ordinals are passed to the accessors to specify which column to return.
OracleDataReader dr = cmd.ExecuteReader(); // C#
dr.Read();
label1.Text = dr["department_name"].ToString(); // C# retrieve by column name
label1.Text = dr.GetString(0).ToString(); // return a .NET data type
label1.Text = dr.GetOracleString(0).ToString(); // return an Oracle data type
In this simplified example, the returned value of department_name is a string and is used to set the value of the label control's text property, which is also a string. But if department_id, which is not a string, had been retrieved instead, there would be a data type mismatch. The .NET runtime attempts to implicitly convert from one data type to another when the source and destination data types don't match. Sometimes the data types are incompatible and the implicit conversion fails, throwing an exception. But even when it works, it's still better to use explicit data type conversions instead of implicit data type conversion.
An explicit cast to integer is shown below:
Label1.Text = CStr(dr.Item("department_id")) ' Visual Basic integer to string cast
C# is not as forgiving as Visual Basic on implicit conversions. You'll find yourself doing explicit conversions:
label1.Text = dr.GetInt16("department_id").ToString(); // C#
You can explicitly cast scalar values as well as arrays.
Close and Dispose
Either the connection object's Close or the Dispose method should be called to close the connection to the database. The Dispose method calls the Close method implicitly.
conn.Close() ' Visual Basic
conn.Dispose() ' Visual Basic
conn.Close(); // C#
conn.Dispose(); // C#
You don't have to explicitly call Close or Dispose if you use VB's Using keyword or C#'s using keyword.
using (OracleConnection conn = new OracleConnection(oradb)) // C#
{
conn.Open();
OracleCommand cmd = new OracleCommand();
cmd.Connection = conn;
cmd.CommandText = "select department_name from departments where department_id = 10";
cmd.CommandType = CommandType.Text;
OracleDataReader dr = cmd.ExecuteReader();
dr.Read();
label1.Text = dr.GetString(0);
}
In addition, OracleCommand includes a Dispose method; OracleDataReader includes a Close and Dispose method. Closing and disposing .NET objects free up system resources, ensuring more efficient application performance, which is especially important under high load conditions. You can experiment with some of the concepts we've learned here in Lab 1 (Retrieving Data from the Database) and Lab 2 (Adding Interactivity).
Error Handling
When an error occurs, .NET applications should gracefully handle the error and inform the user with a meaningful message. Try-Catch-Finally structured error handling is a part of .NET languages. Here is a relatively minimalist example of using the Try-Catch-Finally syntax:
' Visual Basic
Try
conn.Open()
Dim cmd As New OracleCommand
cmd.Connection = conn
cmd.CommandText = "select department_name from departments " _
+ "where department_id = " + TextBox1.Text
cmd.CommandType = CommandType.Text
If dr.Read() Then
Label1.Text = dr.Item("department_name") ' or use dr.Item(0)
End If
Catch ex As Exception ' catches any error
MessageBox.Show(ex.Message.ToString())
Finally
' In a real application, put cleanup code here.
End Try
// C#
try
{
conn.Open();
OracleCommand cmd = new OracleCommand();
cmd.Connection = conn;
cmd.CommandText = "select department_name from departments where department_id = " + textBox1.Text;
cmd.CommandType = CommandType.Text;
if (dr.Read()) // C#
{
label1.Text = dr["department_name"].ToString();
// or use dr.GetOracleString(0).ToString()
}
}
catch (Exception ex) // catches any error
{
MessageBox.Show(ex.Message.ToString());
}
finally
{
// In a real application, put cleanup code here.
}
Although this approach will gracefully capture any errors in attempting to get data from the database, it is not user friendly. For example, look at the following message displayed when the database is unavailable:
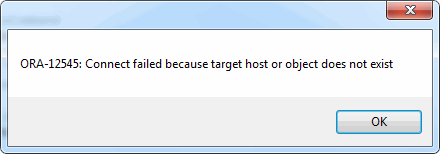
Figure 6 An ORA-12545 error caught and displayed to the user
An ORA-12545 is quite meaningful for an Oracle DBA or developer, but not for an end user. A better solution is to add an additional Catch statement to trap for the most common database errors and provide user-friendly messages.
' Visual Basic
Catch ex As OracleException ' catches only Oracle errors
Select Case ex.Number
Case 1
MessageBox.Show("Error attempting to insert duplicate data.")
Case 12545
MessageBox.Show("The database is unavailable.")
Case Else
MessageBox.Show("Database error: " + ex.Message.ToString())
End Select
Catch ex As Exception ' catches any error
MessageBox.Show(ex.Message.ToString())
// C#
catch (OracleException ex) // catches only Oracle errors
{
switch (ex.Number)
{
case 1:
MessageBox.Show("Error attempting to insert duplicate data.");
break;
case 12545:
MessageBox.Show("The database is unavailable.");
break;
default:
MessageBox.Show("Database error: " + ex.Message.ToString());
break;
}
}
catch (Exception ex) // catches any error not previously caught
{
MessageBox.Show(ex.Message.ToString());
}
Notice the two Catch statements in the code sample above. If there aren't any Oracle errors to catch, the first Catch statement branch is skipped, leaving any other non-Oracle error to be caught by the second Catch statement. Catch statements must be ordered in the code from most specific to most general. After implementing the user-friendly exception handling code, the ORA-12545 error message appears as follows:
The Finally code block is always executed regardless of whether or not an error occurred. It is where cleanup code belongs. If you don't use Using or using, you should dispose your connection and other objects in the Finally code block.
select department_id, department_name, location_id from departments where department_id = 10
To keep things simple for this article, we are using a single table, the departments table. To obtain the values of the columns, either zero-based ordinals or column names can be used. Ordinals are relative to the order in the query. Thus, the location_id column's value can be retrieved in Visual Basic by using either dr.Item(2) or dr.Item("location_id").
Here is a code snippet that concatenates the department_name and location_id columns from the previous query:
Label1.Text = "The " + dr.Item("department_name") + " department is in " _
+ dr.Item("location_id") ' VB
label1.Text = "The " + dr["department_name"].ToString() + " department is in " +
dr["location_id"].ToString(); // C#
Now consider a query that returns multiple rows:
select department_id, department_name, location_id from departments
To process multiple rows returned from an OracleDataReader, some type of looping construct is needed. Furthermore, a control that can display multiple rows is desirable. An OracleDataReader is a forward-only, read-only cursor, so it can't be bound to an updateable or fully scrollable control such as a Windows Forms DataGrid control. An OracleDataReader is compatible with a ListBox control, as the following code snippet illustrates:
While dr.Read() ' Visual Basic
ListBox1.Items.Add("The " + dr.Item("department_name") _
+ " department is in " + dr.Item("location_id"))
End While
while (dr.Read()) // C#
{
listBox1.Items.Add("The " + dr["department_name"].ToString() + " department is in " +
dr["location_id"].ToString());
}
Lab 3 (Retrieve Multiple Columns and Rows with an OracleDataReader) highlights some of these concepts.
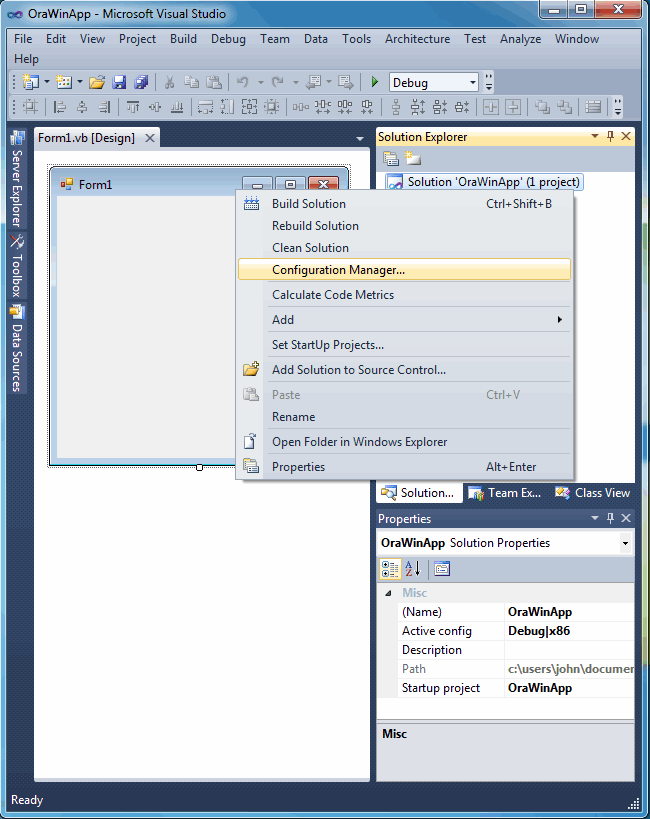
Figure 8 You can use the Configuration Manager to change the target platform type when building on Windows x64.
With the popularity of Microsoft's .NET Framework, many developers are hungry for information about the best means of integrating .NET applications with Oracle—not only in terms of basic connectivity, but also in relationship to effective and efficient application development using Microsoft Visual Studio 2010. (The Visual Studio 2005/2008 version of this article is found here. )
In this article, I'll explain the basic yet essential processes involved in building a C# or Visual Basic .NET application that uses an Oracle database, including:
- How to add project references to support Oracle class libraries in your .NET project
- How to create Oracle Database connection strings
- How to work with Connection, Command, and DataReader objects
You will have the opportunity to apply what you have learned in three practice labs, ranging in difficulty from the relatively simple to the more complex. If you are already familiar with building .NET applications for Oracle Database with Visual Studio 2005/2008, the experience with Visual Studio 2010 is very similar.
For information and labs about how to secure your application, see my article "Securing a .NET Application on the Oracle Database." (Also, see the OTN .NET Developer Center for technical articles covering a range of Oracle .NET application lifecycle issues.)
Note that the free Oracle Developer Tools for Visual Studio, available for download from OTN, provides a Visual Studio add-in that makes the development of .NET apps on Oracle much easier and more intuitive. That subject is beyond our scope here, however; see the Oracle Developer Tools for Visual Studio Product Center for more information.
.NET Data Provider
In addition to basic Oracle client connectivity software, .NET applications require the use of what is known as a managed data provider (where "managed" refers to code managed by the .NET framework). The data provider is the layer between the .NET application code and the Oracle client connectivity software. In almost every case, the best performance is achieved by using a provider optimized for a specific database platform instead of the generic .NET OLE DB data provider.
Oracle, Microsoft, and third-party vendors all offer .NET data providers optimized for an Oracle database. Oracle and Microsoft make their Oracle data providers available for free. Microsoft's provider for the .NET Framework is deprecated. Oracle continues to support and develop their .NET data provider, Oracle Data Provider for .NET (ODP.NET). In this article, we will use ODP.NET, which is included with the Oracle Database or as a separate download.
ODP.NET provides standard ADO.NET data access, while exposing Oracle database-specific features, such as XML DB, data access performance optimizations, and Real Application Clusters load balancing and fast connection failover. The current ODP.NET version, 11.2, supports connecting to Oracle Database 9i Release 2 servers and higher versions. The database server can be on Windows, Linux, UNIX, or any other operating system platform Oracle database supports.
When ODP.NET and Oracle client software are installed, application development using Visual Studio can begin. It's a good idea to confirm client connectivity before starting development. If you can connect to Oracle Database using Oracle client software, such as SQL*Plus on the same machine as Visual Studio, then your Oracle client-side software is properly installed and configured.
If you are new to Oracle, see the section "Installing .NET Products" in the Oracle Database 2 Day Developer's Guide for background information regarding installing and configuring ODP.NET specifically, or to the Oracle Database Documentation Library for general information about Oracle Database.
Creating a Project in Visual Studio 2010
Let’s create an ODP.NET application that retrieves data from the Oracle database. Later, we’ll see how to perform error handling with ODP.NET and handle an additional data retrieval scenario.
After starting Visual Studio, the first task is to create a project. You can either click New Project as shown below or select File | New | Project.
Figure 1 Creating a new project in Visual Studio 2010
A New Project dialog box appears. On the left side of the dialog box under Installed Templates, select the programming language of your choice. In our example, Visual Basic was chosen. On the middle of the dialog, choose a project template. To keep things simple, a Windows Forms Application is selected.
Figure 2 Using the New Project dialog
You'll want to specify meaningful names for the project name (we used OraWinApp) and the solution name (we used OraWinApp). A solution contains one or more projects. When a solution contains only one project, many people use the same name for both. Notice that there is a dropdown list box allowing you to specify which version of the .NET Framework you want to target. If you are writing applications for an older version of the .NET Framework, you should select the appropriate version from the dropdown list. Click the Ok button to continue.
Adding a Reference
Because our project must connect to an Oracle database, it is necessary to add a reference to the ODP.NET DLL containing the data provider of our choice. Within the Solution Explorer on the right side of Visual Studio, select the project name, right click and select Add Reference. Alternatively, you can go to the menu bar and select Project and then select Add Reference.
Figure 3 Adding a reference
The Add Reference dialog box appears. Select the .NET tab. Visual Studio will construct a list of .NET components available for you to add to your project. This may take several seconds. When complete, you can click on the Component Name column to alphabetize the component list.
Figure 4 Selecting the ODP.NET Managed Data Provider for .NET 4
ODP.NET is found under the Oracle.DataAccess component name. Select Oracle.DataAccess from the list, then click the OK button to make the ODP.NET data provider known to your project. Be sure to select the correction version. Since this is a .NET 4 project, the 4.112.2.0 version of Oracle.DataAccess was chosen here, but you can chose any ODP.NET version beginning with 4.
Visual Basic/C# Statements
After adding references, it is standard practice to add Visual Basic Imports statements or C# using statements. Technically, these statements are not required, but they do allow you to refer to database objects without using lengthy, fully qualified names.
By convention, these statements appear at or near the top of a code file, before the namespace or class declaration.
Imports Oracle.DataAccess.Client ' Visual Basic ODP.NET Oracle managed provider
using Oracle.DataAccess.Client; // C# ODP.NET Oracle managed provider
If you added the reference, Intellisense will help you complete the addition of an Imports or using statement as shown in Figure 5.
Figure 5 Adding an Imports statement in Visual Basic
Connection Strings and Objects
An Oracle connection string is inseparable from Oracle names resolution. In this article, we will connect to Oracle’s sample HR schema with user id “hr” and password “hr”. The tnsnames.ora file is an Oracle network configuration file that defines database addresses for establishing connections. Suppose we had a database alias of OraDb defined in a tnsnames.ora file as follows:
OraDb=
(DESCRIPTION=
(ADDRESS_LIST=
(ADDRESS=(PROTOCOL=TCP)(HOST=ORASRVR)(PORT=1521))
)
(CONNECT_DATA=
(SERVER=DEDICATED)
(SERVICE_NAME=ORCL)
)
)
The OraDb alias defines the database address connection information for the client. To use the OraDb alias defined in the tnsnames.ora file shown above, you would use the following syntax:
Dim oradb As String = "Data Source=OraDb;User Id=hr;Password=hr;" ' Visual Basic
string oradb = "Data Source=OraDb;User Id=hr;Password=hr;"; // C#
You can modify the connection string to obviate the need for the tnsnames.ora file, however. Simply replace the name of the alias with how it would be defined in a tnsnames.ora file. The database alias in this article is specific to my database setup. (Click here for more information about creating a database alias for your database.)
' Visual Basic
Dim oradb As String = "Data Source=(DESCRIPTION=" _
+ "(ADDRESS=(PROTOCOL=TCP)(HOST=ORASRVR)(PORT=1521))" _
+ "(CONNECT_DATA=(SERVICE_NAME=ORCL)));" _
+ "User Id=hr;Password=hr;"
// C#
string oradb = "Data Source=(DESCRIPTION="
+ "(ADDRESS=(PROTOCOL=TCP)(HOST=ORASRVR)(PORT=1521))"
+ "(CONNECT_DATA=(SERVICE_NAME=ORCL)));"
+ "User Id=hr;Password=hr;";
As you can see above, the username and password are embedded in the connection string in clear text. This is the simplest approach to creating a connection string. However, the clear text approach is undesirable from a security perspective. In particular, you must understand that compiled .NET application code is only marginally more secure than the clear text source code files. It is very easy to decompile .NET DLL and EXE files and view the original clear text contents. (Encryption is in fact the appropriate solution, but that subject would be a quite lengthy digression from our discussion here.)
Next, you must instantiate a connection object from the connection class. The connection string must be associated with the connection object.
Dim conn As New OracleConnection(oradb) ' Visual Basic
OracleConnection conn = new OracleConnection(oradb); // C#
Notice that the connection string is associated with the connection object by being passed through the object's constructor, which is overloaded. The constructor's other overload allows the following alternative syntax:
Dim conn As New OracleConnection() ' Visual Basic
conn.ConnectionString = oradb
OracleConnection conn = new OracleConnection(); // C#
conn.ConnectionString = oradb;
After associating a connection string with a connection object, use the Open method to make the actual connection.
conn.Open() ' Visual Basic
conn.Open(); // C#
We'll cover error handling later.
Command Object
The command object is used to specify the SQL command text that is executed, either a SQL string or a stored procedure. Similar to the connection object, it must be instantiated from its class and it has an overloaded constructor. In this sample, ODP.NET will perform a SQL query to return the department_name from the departments table where the department_id is 10.
Dim sql As String = "select department_name from departments where department_id = 10" ' Visual Basic
Dim cmd As New OracleCommand(sql, conn)
cmd.CommandType = CommandType.Text
string sql = " select department_name from departments where department_id = 10"; // C#
OracleCommand cmd = new OracleCommand(sql, conn);
cmd.CommandType = CommandType.Text;
Using different overloads, the syntax can be structured slightly differently. The command object has methods for executing the command text, which will be seen in the next section. Different methods are appropriate for different types of SQL commands.
Retrieving a Scalar Value
Retrieving data from the database can be accomplished by instantiating an OracleDataReader object and using the OracleCommand’s ExecuteReader method, which returns an OracleDataReader object. Returned data is accessible by passing either the column name or zero-based column ordinal to the OracleDataReader.
Dim dr As OracleDataReader = cmd.ExecuteReader() ' Visual Basic
dr.Read()
Label1.Text = dr.Item("department_name") ' retrieve by column name
Label1.Text = dr.Item(0) ' retrieve the first column in the select list
Label1.Text = dr.GetString(0) ' return a .NET data type
Label1.Text = dr.GetOracleString(0) ' return an Oracle data type
C# developers must use accessor type methods for retrieving data. There are typed accessors for returning .NET native data types and others for returning native Oracle data types, all of which are available in C#, Visual Basic, or any other .NET language. Zero-based ordinals are passed to the accessors to specify which column to return.
OracleDataReader dr = cmd.ExecuteReader(); // C#
dr.Read();
label1.Text = dr["department_name"].ToString(); // C# retrieve by column name
label1.Text = dr.GetString(0).ToString(); // return a .NET data type
label1.Text = dr.GetOracleString(0).ToString(); // return an Oracle data type
In this simplified example, the returned value of department_name is a string and is used to set the value of the label control's text property, which is also a string. But if department_id, which is not a string, had been retrieved instead, there would be a data type mismatch. The .NET runtime attempts to implicitly convert from one data type to another when the source and destination data types don't match. Sometimes the data types are incompatible and the implicit conversion fails, throwing an exception. But even when it works, it's still better to use explicit data type conversions instead of implicit data type conversion.
An explicit cast to integer is shown below:
Label1.Text = CStr(dr.Item("department_id")) ' Visual Basic integer to string cast
C# is not as forgiving as Visual Basic on implicit conversions. You'll find yourself doing explicit conversions:
label1.Text = dr.GetInt16("department_id").ToString(); // C#
You can explicitly cast scalar values as well as arrays.
Close and Dispose
Either the connection object's Close or the Dispose method should be called to close the connection to the database. The Dispose method calls the Close method implicitly.
conn.Close() ' Visual Basic
conn.Dispose() ' Visual Basic
conn.Close(); // C#
conn.Dispose(); // C#
You don't have to explicitly call Close or Dispose if you use VB's Using keyword or C#'s using keyword.
using (OracleConnection conn = new OracleConnection(oradb)) // C#
{
conn.Open();
OracleCommand cmd = new OracleCommand();
cmd.Connection = conn;
cmd.CommandText = "select department_name from departments where department_id = 10";
cmd.CommandType = CommandType.Text;
OracleDataReader dr = cmd.ExecuteReader();
dr.Read();
label1.Text = dr.GetString(0);
}
In addition, OracleCommand includes a Dispose method; OracleDataReader includes a Close and Dispose method. Closing and disposing .NET objects free up system resources, ensuring more efficient application performance, which is especially important under high load conditions. You can experiment with some of the concepts we've learned here in Lab 1 (Retrieving Data from the Database) and Lab 2 (Adding Interactivity).
Error Handling
When an error occurs, .NET applications should gracefully handle the error and inform the user with a meaningful message. Try-Catch-Finally structured error handling is a part of .NET languages. Here is a relatively minimalist example of using the Try-Catch-Finally syntax:
' Visual Basic
Try
conn.Open()
Dim cmd As New OracleCommand
cmd.Connection = conn
cmd.CommandText = "select department_name from departments " _
+ "where department_id = " + TextBox1.Text
cmd.CommandType = CommandType.Text
If dr.Read() Then
Label1.Text = dr.Item("department_name") ' or use dr.Item(0)
End If
Catch ex As Exception ' catches any error
MessageBox.Show(ex.Message.ToString())
Finally
' In a real application, put cleanup code here.
End Try
// C#
try
{
conn.Open();
OracleCommand cmd = new OracleCommand();
cmd.Connection = conn;
cmd.CommandText = "select department_name from departments where department_id = " + textBox1.Text;
cmd.CommandType = CommandType.Text;
if (dr.Read()) // C#
{
label1.Text = dr["department_name"].ToString();
// or use dr.GetOracleString(0).ToString()
}
}
catch (Exception ex) // catches any error
{
MessageBox.Show(ex.Message.ToString());
}
finally
{
// In a real application, put cleanup code here.
}
Although this approach will gracefully capture any errors in attempting to get data from the database, it is not user friendly. For example, look at the following message displayed when the database is unavailable:
Figure 6 An ORA-12545 error caught and displayed to the user
An ORA-12545 is quite meaningful for an Oracle DBA or developer, but not for an end user. A better solution is to add an additional Catch statement to trap for the most common database errors and provide user-friendly messages.
' Visual Basic
Catch ex As OracleException ' catches only Oracle errors
Select Case ex.Number
Case 1
MessageBox.Show("Error attempting to insert duplicate data.")
Case 12545
MessageBox.Show("The database is unavailable.")
Case Else
MessageBox.Show("Database error: " + ex.Message.ToString())
End Select
Catch ex As Exception ' catches any error
MessageBox.Show(ex.Message.ToString())
// C#
catch (OracleException ex) // catches only Oracle errors
{
switch (ex.Number)
{
case 1:
MessageBox.Show("Error attempting to insert duplicate data.");
break;
case 12545:
MessageBox.Show("The database is unavailable.");
break;
default:
MessageBox.Show("Database error: " + ex.Message.ToString());
break;
}
}
catch (Exception ex) // catches any error not previously caught
{
MessageBox.Show(ex.Message.ToString());
}
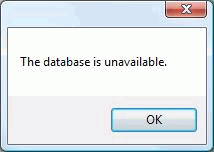
Notice the two Catch statements in the code sample above. If there aren't any Oracle errors to catch, the first Catch statement branch is skipped, leaving any other non-Oracle error to be caught by the second Catch statement. Catch statements must be ordered in the code from most specific to most general. After implementing the user-friendly exception handling code, the ORA-12545 error message appears as follows:
Figure 7 A user-friendly error message for an ORA-12545 error
The Finally code block is always executed regardless of whether or not an error occurred. It is where cleanup code belongs. If you don't use Using or using, you should dispose your connection and other objects in the Finally code block.
Retrieving Multiple Values Using a DataReader
Thus far our examples have only showed how to retrieve a single value. An OracleDataReader can retrieve values for multiple columns and multiple rows. First consider a multiple column, single row query:select department_id, department_name, location_id from departments where department_id = 10
To keep things simple for this article, we are using a single table, the departments table. To obtain the values of the columns, either zero-based ordinals or column names can be used. Ordinals are relative to the order in the query. Thus, the location_id column's value can be retrieved in Visual Basic by using either dr.Item(2) or dr.Item("location_id").
Here is a code snippet that concatenates the department_name and location_id columns from the previous query:
Label1.Text = "The " + dr.Item("department_name") + " department is in " _
+ dr.Item("location_id") ' VB
label1.Text = "The " + dr["department_name"].ToString() + " department is in " +
dr["location_id"].ToString(); // C#
Now consider a query that returns multiple rows:
select department_id, department_name, location_id from departments
To process multiple rows returned from an OracleDataReader, some type of looping construct is needed. Furthermore, a control that can display multiple rows is desirable. An OracleDataReader is a forward-only, read-only cursor, so it can't be bound to an updateable or fully scrollable control such as a Windows Forms DataGrid control. An OracleDataReader is compatible with a ListBox control, as the following code snippet illustrates:
While dr.Read() ' Visual Basic
ListBox1.Items.Add("The " + dr.Item("department_name") _
+ " department is in " + dr.Item("location_id"))
End While
while (dr.Read()) // C#
{
listBox1.Items.Add("The " + dr["department_name"].ToString() + " department is in " +
dr["location_id"].ToString());
}
Lab 3 (Retrieve Multiple Columns and Rows with an OracleDataReader) highlights some of these concepts.
Building and Running on Windows x64
When running Visual Studio 2010 on a Windows x64 operating system, you can use the Configuration Manager to change the target platform type. Select the solution in the Solution Explorer, right-click, and select Configuration Manager.Figure 8 You can use the Configuration Manager to change the target platform type when building on Windows x64.


No comments :
Post a Comment